Tips & Tricks
Troubleshooting Bag Making Problems!

Hi bag makers, we are here to chat about some common issues makers face when sewing! Sewing bags is such a joyful experience, watching a pile of flat fabric become a 3D object, but every once in a while, you can run into tiny issues that will drive you mad! Today, we are going to cover a few of those issues and how you can prevent them in the future!
Puckering Fabric
Do you ever start sewing and suddenly your fabric is puckering or getting ripples as you sew? It can be a truly frustrating experience! Here are 5 tips to help you discover what is happening!
First, make sure you have the best interfacing for the fabric that you are using. Not all interfacing is created equal, and sometimes all it takes is switching the interfacing to something better suited to stop those ripples. It helps stabilise the material so it stays flat as you sew!
Slow your stitching. When you are flying through your sewing, it causes the lower feed dogs to move a lot faster, making the fabric ripple as you go. Slowing down can sometimes stop those ripples immediately. Try to keep a consistent speed as you go.
Increase your stitch length. Sometimes, something as simple as making the stitch length longer is all you need. Especially with sewing a bag versus a quilt. A bag usually has lots of basting, interfacing and stabiliser, so it allows you to have a little more freedom with stitch length, plus you can always go back over your stitches to strengthen them. Increasing the stitch length also puts more space between the lower feed dogs and how fast they go. They will raise at longer intervals, pulling the fabric less.
Loosen your tension. If you find that even after all those changes, your fabric is still rippling, you may just need to loosen the tension. We often start sewing without checking the tension with each project, so testing it before you start your project can save so much grief later!
Lastly, guide your fabric; don’t pull it as you sew. Allow the presser foot and lower feed dogs to do their work. Hold your fabric firm yet gently and guide it as you sew so there’s little tension as you go.
Misaligned Seams
There’s nothing worse than sewing a fun bag like the Stand Up Tote Notice or Classic Carryall Handbag & Tote and getting it all done and seeing the side seams misaligned; it’s devastating!
When you are sewing projects with accents like this, always line up those accents before anything else!
Match those side accent seams and pin them in place. This acts as a reminder while you sew that these points need to line up and to reinforce those seams with some backstitching.


After that, you can clip or pin the rest of the bag/clutch in place and sew!

This gives you perfectly aligned seams!

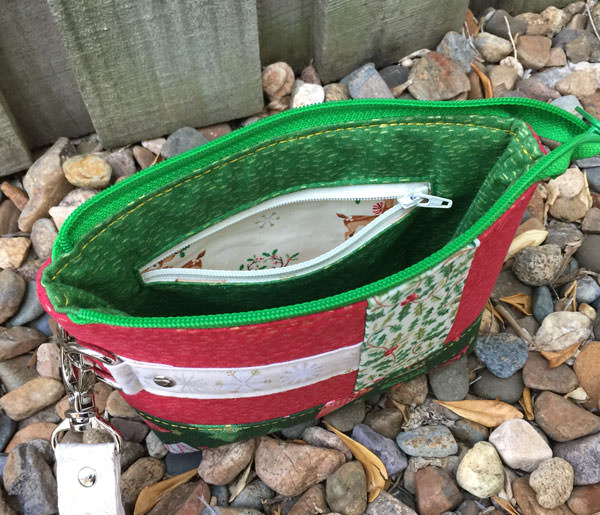
Turn Through Seams
When making bags or pouches, that turning spot never sits smoothly, or it gets really stretched out. The BEST place to hide it is your zipper pocket! This little trick will work for any bag that has a zipper pocket, or you can add one to any design! (Use this tutorial here to add a pocket to any bag!) When you hide the turning hole in your zipper pocket, it gives you a near-seamless finish.
Trim the seam allowance on your zipper pocket at an angle for easy pressing.

Fold over seam 1/4” (0.6cm) and press well. Pin in place and sew across with a scant 1/8” (0.3cm) seam allowance.

And tuck in your pocket.
Using that small top stitching seam allowance gives a tidy finish to your turning hole!
Follow our tutorial, Turn Through Seams Be Gone, for a clean finish to any bag or check out the Classic Clutch Comprehensive Video Class for a video version of the steps!

Wrinkly Zippers
There’s nothing worse than finishing a cute little clutch like the Summer Basics Pouch and seeing that top zipper all wrinkly! Don’t worry, we are here to help! The most important thing when sewing an exterior zipper like this or a recessed zipper is the quality of your zipper. The better the zipper, the better the finished product!
In the photo below, you can see that the blue zipper is incredibly thin and wrinkly. It’s a cheap zipper by the yard on Amazon. It’s not the best to use for exterior main zippers because that zipper tape is going to move all over the place as you sew!
The white zipper is also a cheaper Amazon brand, but you can see the tape is of a much better quality, so you will get a smoother sew. Lastly, the green zipper is a ByAnnie zipper and while expensive, gives the BEST sew. The zipper tape is sturdy and doesn’t wrinkle at all when you sew.

Now you’ve got your zipper, how do you sew it so it doesn’t wrinkle? Like with our previous comments about fabric ripples as you sew, the same applies to zippers. Increase your stitch length. Your fabric will stretch slightly as it moves along the lower feed dogs, whereas your zipper will not. Increasing the stitch length stretches the fabric less, so it stays in line with the zipper.

When attaching your zipper, you want to make sure you are gluing, taping or clipping your zipper in place and not pinning the entire way. When you pin, you naturally make little ripples in the zipper tape. This will show up as you sew. You can use fabric glue like Sew-Tight, Fabric Tac or even a regular glue stick! If you lightly press it with your iron, it will set/dry the glue in place quickly.


You can place a pin at the beginning and end to hold the zipper in place, and so you know where to stop and start your sewing.

If you opt to use tape, we recommend a wash-away kind so it doesn’t gum up your needle OR trim your tape so it’s only 1/8” (0.3cm) wide and won’t get caught in the stitching.
Gusset Not Lining Up
We have a number of bags that have gussets on them, one of them being the Creatives tote. It has a large gusset with gentle curves at the corners, and it can be intimidating sewing it in place!
When sewing a gusset, you want to move slowly and focus on midpoints and straight edges BEFORE the curves!
Clip or pin your midpoint in place first. Next, you will clip or pin your end points in place.

Work along all straight edges, clipping or pinning in place. Stopping right before the curve starts.

At the curve, it may feel like it’s not going to work, but what you will do now is snip into that seam. Your snips will be about 1/2” (1.3cm) apart and no more than 1/4” (0.6cm) deep.

Once you have that done, guide/ease the middle of the curve into place and then place a clip on either side of it. Your gusset should sit beautifully!

Gussets don’t have to be scary; you just have to move slowly!
Now you should be able to troubleshoot some of the more frustrating parts of bag making. Do you have any other parts of bag making that you need help with? Let us know in the comments below, and we can add them to a future blog post!
Don’t forget, you can always check out our YouTube channel for all sorts of bag-making tips and tricks!
Happy sewing!
Holy cow! Where have these troubleshooting tips been my whole life?! I have literally tossed so many projects in the trash because I couldn’t figure out what I was doing wrong and I didn’t know how to search Pinterest or Google for help fixing the issue! THANK YOU OH SO MUCH FOR POSTING THIS!!
You are most welcome Lainee!! We are so pleased to hear they have helped! Thank you for reading! 🙂